![]()
![]()
This section leads you step-by-step through the star test. Before we get to that, there are three things you should do in preparation.
Even minor aberrations appear obvious during the star test. And a major problem, such as a seriously miscollimated telescope, will overwhelm all others. You should collimate your telescope before the star test. Setting up the telescope an hour before the test allows the optics time to cool to the ambient air temperature. The optics cool by releasing heat to the surrounding air. If you do the star test too soon after setup, all you'll see are the debilitating effects of turbulent air in front of the mirror. Use a high magnification eyepiece (1-mm exit pupil) and a moderately bright star--about 3rd magnitude--for the test. I recommend using 20X to 25X per inch of aperture. If the seeing is unstable even after the scope has been outside an hour, try fitting a #23A Wratten color filter to the eyepiece. The red light image should be steadier.
| The Star Test: What Should I See? |
If the slightly defocused image of a moderately bright star at 25X per inch of aperture looks similar to this illustration, the telescope's collimation is good. You should see an identical pattern of concentric rings of light around a central dot of light. My illustration probably exaggerates the separation between the rings but it is only meant to approximate the appearance. Also an obstructed optical system, such as a reflector or catadioptric telescope, will produce a diffraction pattern with very faint inner rings. The faint inner portion of the diffraction pattern is the caused by shadow of the secondary mirror. |
| The Star Test: Collimation Problems |
|
| The Star Test: Astigmatism |
The other possibility is that your telescope's optics are astigmatic. If your scope is a refractor, this is justification to return the instrument for repair, exchange or refund. If you own a reflector or a catadioptric, the astigmatism may be correctable. Newtonian owners should first check the primary mirror by making small adjustments to its collimation screws. Adjustments to the secondary mirror are best left to the light of day until you become more experienced. Owners of SCTs can make adjustments by tweaking the secondary mirror collimation screws. |
| The Star Test: Spherical Aberration and Turned Down Edge |
Spherical aberration is present to some degree in all optics. The amount of error in the optical figure is measured in wavelengths of light. A telescope producing an image with 1/4 wave spherical aberration at the eyepiece is still diffraction limited. Spherical aberration produces a sharp pattern (illustrated at left) inside focus and a softer, ill-defined pattern outside focus. The greater the disparity, the worse the aberration. Unacceptable spherical aberration will produce a diffraction pattern inside focus with a very bright outer ring and a pattern outside focus that is very soft. Acceptable spherical aberration will produce patterns that are still very similar in appearance. The pattern outside focus will be slightly soft. The pattern inside focus will have inner rings that are similar in brightness to a soft outer diffraction ring. A turned down edge is exactly that. The outer edge of the optic slopes downward. The result is scattered light, and loss of contrast on fine lunar and planetary detail. Turned down edge produces a diffraction pattern similar to that produced by a telescope suffering from spherical aberration. A turned down edge will produce a more defined diffraction pattern outside focus. Also, the inside pattern will present rings at irregular intervals encased within an overall diffuse glow. This aberration is common to telescopes that use mirrors, so Newtonian and catadioptric owners will likely encounter turned down edge. What should you do if your telescope suffers from spherical aberration or turned down edge? First, don't panic. The star test makes even acceptable imperfections look obvious. Your telescope may have an aberration that does not significantly affect performance. The best way to determine your telescope's overall quality is to point it at the Moon or Jupiter. These objects show a wealth of subtle detail through a good amateur telescope. If you are pleased and impressed by the views you get of the Moon and planets, you're optics are probably fine. If you're not sure what you should be seeing, check out my Planetary Observing page. |
| The Star Test: Poor Seeing |
Bad seeing can have local causes. Are you setup on concrete or asphalt? These materials absorb lots of solar energy during the day and release it at night, causing the air near ground level to be unsteady. Are you observing over rooftops and buildings? These are also heat sources that can muck up the seeing. Try to observe from a location with lots of grass, trees or fresh water nearby. An elevated deck places the telescope above the ground seeing. |

Home | About Cosmic Voyage | Getting Started | Deep-sky Observing | Planetary Observing | Astrophotography | Sketching | Glossary | Web Links
URL: http://www.cosmicvoyage.net
Layout, design & revisions © W. D. Ferris
Comments and Suggestions: wdferris1@gmail.com
Revised: February 11, 2002 [WDF]
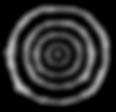 Due to the wave nature of light, The focused image of a star is not actually a point. It is a pattern of bright and dark bands called an airy disk. The size of the airy disk is determined by the aperture of your telescope, the quality of the optics and the steadiness of the atmosphere. Good optics and steady air will produce a focused airy disk that looks like a point of light at low power. However at higher magnification and slightly defocused, a diffraction pattern similar to the illustration at left is produced.
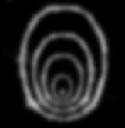 Misaligned optics will give the diffraction pattern an appearance similar to the one at left. The outer rings are not concentric and the center dot shifts from side-to-side on either side of focus. One or two small turns of a collimation screw should correct this problem. Newtonian owners should make corrections to the primary mirror cell collimation screws. Catadioptric owners will need to adjust the secondary mirror.
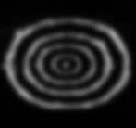 A diffraction pattern similar to the illustration at left is an indication that astigmatism is present. The elongated appearance will shift its axis by 90 degrees as you rack through focus. If you're lucky, the astigmatism will be someplace other than the telescope optics. The first source to check is you observing eye. Rotate you head about the eyepiece. Does the astigmatism move with you? If so, you've found the source of the problem. The next suspect to be investigated is the eyepiece. Spin the eyepiece. If the astigmatism follows the eyepiece, that's where the problem resides. You can check the star diagonal of your telescope in the same manner.
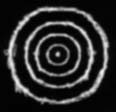 A perfect telescope will produce identical diffraction patterns on either side of focus. However, few telescopes are perfect. Two of the most common problems are spherical aberration and turned down edge. These problems are revealed by diffraction patterns that change on either side of focus. The pattern on one side will look much sharper or better defined than the pattern on the other.
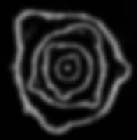 The telescope has been sitting outside cooling to the night air for hours but the airy disk still looks like you're watching it through a layer of boiling water. The likely culprit is bad seeing. The air overhead is simply too turbulent. Try fitting a #23A Wratten color filter to the eyepiece to improve the view. If this doesn't help, you should postpone the star test for another night.