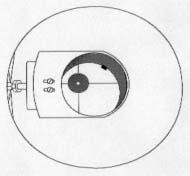
 The secondary mirror should appear centered within the focus tube as illustrated at left. Looking through the focus tube at the secondary mirror's outline, rack the focuser in-and-out until the primary mirror appears to fill the secondary. The secondary mirror should appear centered within the focus tube. If the secondary appears offset, either toward or away from the primary mirror, move the secondary until it appears centered. Does the secondary look circular in shape. If it has an oval outline, the secondary needs to be rotated until its shape is perfectly circular.
A film canister lid is an inexpensive but useful tool in this process. Simply drill a hole through the center of the lid and place the lid over the focus tube opening. Looking through the hole aligns your eye to the light path, which should be centered within the focus tube.
I'm not a big fan of expensive collimation tools. Collimation has been done successfully for hundreds of years without laser collimators and the like. I did plunk down about $20 for a collimating eyepiece available from Orion Telescopes and Binoculars. The current version costs a little more but I think you'll find it very useful.
|
![]()
![]()
