![]()
![]()
Two equatorial mount designs, the German equatorial and the equatorial fork mount, account for the vast majority of equatorial mounts in use by amateur astronomers. Let's talk about how to polar align each. We'll start with the German equatorial mount.
| The German Equatorial Mount |
You'll recall that declination is similar to latitude and that right ascension is the same as longitude. If we could float high above the North pole, we would see an Earth that spins in a counterclockwise direction completing one rotation every 24 hours. As a result, the stars seem to move east-to-west across the sky to an earth-bound observer. The motorized drive at the back end of the right ascension axis is there to allow the telescope to track objects as they move westward across the sky. But its success depends upon accurate polar alignment. |
|
|
| Step 1: Set the Scope to Your Latitude |
Before setting the tilt, I check to make sure the pier is level. I use a Sears "Craftsman" Torpedo Level, which has a magnetized bar along one side. If the pier is level, then I can accurately set the tilt of the mount in broad daylight using a protractor. I use a Sears "Craftsman" protractor with a magnetic base to set the tilt of my mount. When the protractor reads 35 degrees (Flagstaff's latitude), I lock the mount in place. This can be done at home during the day, which is much easier than at night in the dark in some remote field. It's worth repeating that the pier/tripod needs to be level in order for this step to work as described. As long as you level the mount, you never need to change the tilt when setting up at your regular observing site. |
| Step 2: Setting Up the Mount |
When the sky becomes dark enough that stars begin to appear, look for Polaris. Polaris is a 3rd magnitude star at the end of the Little Dipper's handle. You will find it in the same location every night. Look to the North. Polaris will be at an altitude above the horizon equal to your local latitude. Make a fist and extend it to arm's length. A fist held at arm's length covers about ten degrees of sky. Suppose your latitude is 40 degrees. Polaris will be about four fists above the northern horizon. After finding Polaris, manually reposition the telescope so the right ascension axis is pointing in that direction. You're almost home. |
| Step 3: Align With the Celestial North Pole |
Polaris is flanked by two fainter stars. Together, this group forms a triangular pattern with Polaris being the brightest star along the short leg. The triangle spreads across two degrees of sky. The cross hairs in the diagram are centered at the location of the celestial North pole. Notice its position with respect to Polaris. If you don't see this when looking into the cross hairs, don't be alarmed. You just have a few minor adjustments to make. Do not move the telescope in right ascension or declination to finish the alignment. The mount may have a lock screw that, when loosened, allows you to move the whole mount around the horizon. If not, you'll just have to grab a couple of the mount legs. Rotate the mount around the horizon until Polaris is visible near the cross hairs. Make sure the declination still reads 90 degrees and the optical tube is sitting directly above that north-pointing leg. If the cross hairs are centered on a point close to the illustrated position, then the polar alignment is accurate enough that a clock drive will move the telescope to track objects at high magnification for several minutes at least. This process may take 15- to 30-minutes the first few times you go through it. However, polar alignment will soon become second nature. I spend about five minutes doing this procedure and often am able to use my Newtonian's clock drive to track planets at nearly 400X for 30 minutes or more. If you need extremely accurate polar alignment, then visit my page with instructions on how to use the declination drift method. |

Home | About Cosmic Voyage | Getting Started | Deep-sky Observing | Planetary Observing | Astrophotography | Sketching | Glossary | Web Links
URL: http://www.cosmicvoyage.net
Layout, design & revisions © W. D. Ferris
Comments and Suggestions: wdferris1@gmail.com
Revised: May 1, 2002 [WDF]
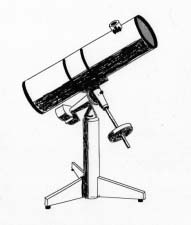 The illustration at left shows a Newtonian reflector on a German equatorial pier mount. The telescope and mount could also be supported by a tripod. The mount has two axes of motion--right ascension and declination--arranged in a T-formation. The declination axis has a counterweight at one end and the telescope sits in a saddle at the other end. The right ascension axis has a motorized drive attached at the back.
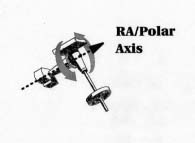 The right ascension axis is also called the polar axis. That's because the right ascension axis needs to be aligned parallel to Earth's axis of rotation in order for the drive to work. The clock drive runs at a rate that would have the telescope complete one rotation about the right ascension axis every 24 hours. That's the same amount of time it takes Earth to complete one rotation. The clock drive turns the telescope in a clockwise direction, which is opposite Earth's counterclockwise rotation. As result, the telescope can remain pointed at a star or planet for hours on end. The counterweight attached to the declination axis is there to balance the weight of the optical tube.
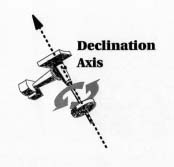 The declination axis is illustrated at left. Few amateur telescopes have motorized declination axes. That's because it isn't necessary for visual observing. There are few objects--asteroids and comets, for example--that exhibit substantial motion in declination through the course of a night. If you want to do astrophotography with your telescope, a motorized declination axis is necessary. The declination axis often has a tension knob that allows you to control the ease of motion.
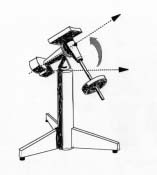 The first step in polar aligning a German equatorial mount is to set the tilt of the mount at an angle equal to your local latitude. This aligns the mount parallel to Earth's axis. The illustration at left shows that angle. Many equatorial mounts have a knob allowing you to make fine adjustments to the mount's tilt.
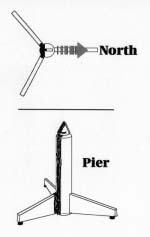 The next step in polar alignment is to setup the pier/tripod mount. Position the mount so the right ascension axis is pointing North. The mount will probably have a leg pointing in that direction, too. This is called the North-pointing leg. Creative, huh? This can be done during twilight. No need to use a compass for this step. Just get the telescope's right ascension axis pointed roughly North.
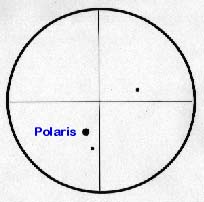 The final step is to align the telescope with the celestial pole. First, rotate the telescope in declination to 90 degrees. This is the declination of the celestial north pole. Second, rotate the telescope in right ascension until the optical tube is sitting directly above your north-pointing leg. The dec axis should point directly at this same leg. Now, look into your finder scope. Hopefully, the view will be similar to the illustration at left.